9/25/12: Hi everyone! I've been working on and just finished my Halloween sketch for this year! I think that I'm going to call it "Harvest Moon." I love this time of year! It is definitely my favorite time of year, with the weather cooling off but not as cold as winter yet. And it is such an inspiring season!
While I was working on this sketch, I took some progress pictures that I'm going to post below. I often show paintings in progress but not how sketches come together. Sometimes sketches, such as small ACEO sketches or 4x6" are very quick and are done in an hour or so, but this 9x12" sketch took several hours, so it was great for showing step by step.


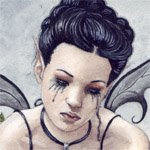
When drawing a full-bodied figure, I almost always start with the body and save the face for last. I know many find working this way strange, but I've found that it works best for me. I get the proportions more accurate when I work on the whole body at the same time rather than doing the face first and working my way out, if that makes sense. And it makes getting her positioned on the page how I want her easier. I can't tell you how many times when I used to start with the face that I'd find the figure off center on the paper or even run out of room for the feet! When I started working this way I don't encounter problems like that.


Now it is time to transfer this to watercolor paper and start painting! I don't know how much of the painting process I will show, but I am going to be stretching the watercolor paper again for this one, and this time I have some gummed tape and gator foam board. So I think I will show what that is like to work with. Hopefully my first experience with it will go smoothly! Check back if you're interested in seeing how that goes. :)
---------------------------------------------
I was hoping to have gotten started on this a few days ago but I didn't get the chance until tonight. I really won't be able to get going on the painting until tomorrow since I have to allow time for the paper to dry after stretching it.
This is only my second time stretching my watercolor paper. I tried it for my "Midnight Travelers" painting this summer for the first time. You can see that process HERE. I didn't really have all the "right" materials then and didn't want to wait for them to be shipped to me, so I just made due the best I could with what I had. After a little trial and error I got it to work and was very impressed with the final result! The paper was so flat and smooth that I'm sure that I will do this with all my larger paintings from now on. I don't really think it will be necessary for smaller ones like 5 x 7" or smaller. I resisted this for a while because I just didn't want to do this extra step, but I finally caved after messing up another painting due to the paper warping. I did the same thing with masking fluid for a long time. I resisted using it, but now I see it as a necessary evil.

This time around, I'm going to be using gummed tape and securing my paper to gatorfoam board. I'd never heard of this board until I'd read up on paper stretching and had seen it recommended a couple times. It's a bit thicker than regular foam board (about a 1/2" thick) and has a water resistant surface, so when you lay your wet watercolor paper on it, it won't absorb any of the liquid and warp the board. I got one that is 16 x 23" since most of my work is smaller than that, I think it will work fine for me. I love how lightweight it is too and it also doubles great as a drawing board for drawing away from a table. :) The gummed tape or kraft paper tape comes in a huge roll like pictured. That aught to last me a while!

My kitty, Freya, was looking on to make sure that I did this correctly! lol

Once the paper is dry, I will add masking tape to tape off this border and keep it paint-free. I've heard that you can soak the tape off of the gatorfoam board, so I hope that true.

Next, I cut four strips of the tape for each of the four sides of the paper.

To soak the paper, I have a plastic container filled with water. In order to wet the strips of gummed tape, I used the sponge brush pictured. I already had some of these from another project and they're in the perfect 2" size!
So I dip the paper in the water for about a 1-2 minutes and then lay it out on my gatorfoam board. I use a paper towel to run over the paper to flatten it and wipe off all excess water. You can use a clean sponge for this too. If using paper towels, make sure they don't have a pattern printed on them as this can transfer to your paper.

Then I wet each strip of gummed tape with my sponge brush and stuck them down one at a time, making sure not to get any of the glue onto the to-be-painted surface. I hope that I didn't smear any in there! I really tried not to, but I won't be sure until I start painting. That seems also to be a good reason to include an extra little border like I did. If I got any glue in the little border, it won't matter.
That is all for now. I need to allow this to dry and then I can transfer my sketch to the paper using graphite paper. So far this seems like a great method to do this! Much easier than the staples I used last time! :)
---------------------------------------------

---------------------------------------------


10/1/12:

Going well so far! Now after some masking fluid, I'll be ready to start painting! :)
---------------------------------------------
*Update* 10/25/12:
"HARVEST MOON"
I finally finished this painting. I had hoped to get it done sooner, but I didn't get to work on it quite as much as I hoped, so it took longer. I'm really happy with how it turned out though. I liked painting the harvest moon and I like the atmosphere it creates! I always love when there's a harvest moon! The scan unfortunately didn't pick up on some of the subtle coloring in the background. There's some golds and rose coloring in the glow from the moon that the scan just washed out. I think I may try re-scanning and adjusting the colors again.
It's 9 x 12" done in watercolor and white gouache. Hope you like it!

Details:

Since this was the first time that I tried stretching my watercolor paper using this method, I wanted to show how it was removed and worked out. I have to say that I really love this method! I'm definitely going to be working this way from now on. The painting so smooth and beautiful and I didn't encounter any problems while working. I don't know why I waited so long to try this.

Here is the painting all done while still taped down to the gator foam board.


The first thing that I had to do was to remove the masking tape that left a clean, white border around the image.

Then, using an X-Acto knife and a t-square as a guide I carefully cut along the edges of the paper. There was a little ridge in the tape where the papers edge was, so it was easy to see where to cut.

I've heard that some leave it with the brown tape, but I don't like it, so I used my paper cutter and cut it off, leaving just the small white border around the outside. I think it looks nice this way and it leaves a little space for matting and framing.

And see how nice and flat the painting is!! It looks just like it did before I even put any paint on it. Why have I been avoiding this step again? Oh yeah, I was being lazy. But no more! For any painting that is larger than 5 x 7" I'm going to stretch from now on. :)

And here is the next great part...
I'd heard that if using gator foam board, that the brown tape can be soaked off of it. So I wet some paper towels and laid them over the tape. I let it sit for about 40 minutes and...

It came right off and the board is good as new!!
I was a little worried about that, as these aren't that cheap, so I didn't want to have to buy a new one all the time.
So there you have it. My first attempt at stretching watercolor paper using brown gummed kraft tape and gator foam board. And it worked out perfectly! I hope you enjoyed seeing the process and the finished painting.
Happy Halloween everyone! :)