I've started a new artwork, and here is the sketch! It features a dark unicorn and fairy. I've only ever drawn a couple unicorns, so I was overdue to do another one. Of my others, one was a commission and the other is a really old drawing that I don't even have on my website.
Last month sometime, I was watching the movie "The Grey" with Liam Neeson and was inspired by all the wintery landscape. And for some reason a unicorn came to mind. I can't explain how these things happen since I don't even know myself. lol That's just how it came to me. And I decided to pair it with a pretty fairy, since I haven't painted any fairies in a while. My Fairies Gallery is lagging behind, without a single painting from this year added to it. It's time to rectify that. ;)

When I sketched this I didn't really leave enough room for the background I had in mind. So I'm going to paint it a little larger than I originally planned to add some extra space for the snow and trees. I took the scanned sketch into Photoshop and made a mock-up of the coloring I'm thinking of using for this. I don't do this for every painting, but sometimes for ones I'm not entirely sure about or are a little more complex.
As I mentioned before, I want this to be a wintery piece, which considering it is about 100 degrees out today, sounds pretty great to me! Okay, so it doesn't have to be winter, but I would definitely be happy with some nice Fall-like weather right now. And some RAIN too! We're having a bit of a drought here in Michigan. Everything is so brown and ugly. ANYWAY... the mock-up I did in PS is basically the direction I'd like to go with this. The colors with real paint will of course vary from this some, but it's gives me a good idea how to proceed. Hmm... I tend to work in blue a lot, don't I? :)
I have no idea what I'm going to name this painting yet. I'll give it some though as I work. Meanwhile, I welcome any suggestions.
---------------------------------------
7/10/12:
Anyway, the heat finally broke this week and it has been a beautiful low to mid 80s. So time to get back to work. I made one disastrous attempt at this painting. The background turned out all wrong. So I'm trying a different approach.
 I've actually managed to go this long as a watercolor artist without ever stretching my paper. I often work small enough that the paper buckling isn't a problem, and when I have done larger paintings I've gotten lucky enough that any warping of the paper didn't effect how the painting turned out. But this is the second time this year, where I've had a wash turn out awful due to the paper buckling and have had to trash the painting. So I'm finally caving and am going to stretch the paper for the first time with this painting. This was kind of a spur of the moment decision, so after soaking the paper in water, I stapled it to foam board. In the future, I will get something more substantial to attach it to. I have some hardboard panels, but I they're too thin to put staples through and they'd be really hard to remove. So hopefully the foam board will do for now. I've read that gator board is a good choice so I think I'll try that next time.
Once the paper is completely dry, then I'll transfer the sketch onto it. I'm also going to put some masking tape around the edges for a clean line, though I know I'm going to trim off at least some of the border. In the future, I will leave a larger border too. This one is cut a little close. Oh well. :)
I just may update this tread with some more progress of this painting, so check back if you want to see it!
---------------------------------------
7/11/12:
 Well, I've learned that foam board is NOT a good surface to attach this to. It seemed like it was going to go well, but then I get up this morning and see that it curved the whole board as shown in the photo. I knew that it might absorb the water since the foam board surface is just paper, but I hoped maybe it would still stay flat because of the foam. No such luck.
So, I've started a new method. The thing is that I have to use materials that I already have right now. The craft stores I have around me (Michaels, Hobby Lobby) are pretty worthless for a lot of art supplies. They don't have any kind of board that would be good for stretching and don't even have gummed tape, which would be nice to try instead of staples. I usually order a lot of my art supplies online, but I don't want to have to wait for them to arrive. I'll get them for future use, but I want to get started on this painting now!
 This time around, I'm going to try using a piece of hardboard that I have. The main reason I didn't try this in the first place is that I would have to use heavy duty staples, which will be harder to remove, and that the board is only 1/8" thick and my shortest staples are 1/4".
 I've solved the thickness problem by taping a layer of foam board to the back of the panel. This gave just enough extra thickness that the staples didn't poke through the back.
 After cutting the paper to the size I want it, I get a container of water and dip the paper in it for a few minutes. Then I lay it flat on the board and smooth it out with a paper towel, pushing all the excess water off of the paper. Once I'm sure that it's flat and ready, I start stapling it down.
 So, now I have it stapled down and am currently waiting for it to dry completely. Fingers crossed that it will work out this time!
7/11 Part 2:
 SUCCESS!!
Ready to move on to painting!
---------------------------------------
7/10/12:
I wish that I was further along with this painting, but I just couldn't gather the energy to work on it much during our 2 week heat wave. I think my brain quit functioning for that period of time! lol It was just way too hot. I have air conditioning, but it is old and just doesn't do a good enough job when it gets to be over 95 degrees. It's better than nothing, I'm sure, but it was still pretty miserable during the day.
Anyway, the heat finally broke this week and it has been a beautiful low to mid 80s. So time to get back to work. I made one disastrous attempt at this painting. The background turned out all wrong. So I'm trying a different approach.

Once the paper is completely dry, then I'll transfer the sketch onto it. I'm also going to put some masking tape around the edges for a clean line, though I know I'm going to trim off at least some of the border. In the future, I will leave a larger border too. This one is cut a little close. Oh well. :)
I just may update this tread with some more progress of this painting, so check back if you want to see it!
---------------------------------------
7/11/12:

So, I've started a new method. The thing is that I have to use materials that I already have right now. The craft stores I have around me (Michaels, Hobby Lobby) are pretty worthless for a lot of art supplies. They don't have any kind of board that would be good for stretching and don't even have gummed tape, which would be nice to try instead of staples. I usually order a lot of my art supplies online, but I don't want to have to wait for them to arrive. I'll get them for future use, but I want to get started on this painting now!


7/11 Part 2:

Ready to move on to painting!
...finally


---------------------------------------
7/12/12:

Yesterday, I laid down the first washes of the painting. It seems as if it is going to work really well with the paper stretched! Pictured to the right is an example of the new wash/s beside my first attempt on unstretched paper. That is the version I threw away and started over. In some cases, I don't mind some texture to the washes of paint, but in this case I don't want anything like that.

So far it seems to be going well. I've built up the color so it is darker in the background behind them, leaving a lighter area where the moonlight will be shining through the trees a little.

Next I'm working on the trees in the background, starting with some of the more distant ones since they'll be lighter.
I know that much of the foreground elements are going to be dark colors or black so I'm not concerned about painting over them now. Except for her skin, which has had masking fluid applied to it to protect it.
---------------------------------------
7/17/12:
 I pretty much have the background done now. I added the nearest, darkest trees. I made the branches a little denser than in the sketch. I also shaded the snow and defined the fairy and unicorn so that they're easier to see when it come time to paint them in. I may think that the background needs more work once I get the foreground figures painted, but for now it looks pretty good.
Now it is time for the fun part... painting the fairy and unicorn! I know I'm going to start her skin next. I'm not sure if I will finish her completely before moving on the the unicorn or work on them both at the same time.

Now it is time for the fun part... painting the fairy and unicorn! I know I'm going to start her skin next. I'm not sure if I will finish her completely before moving on the the unicorn or work on them both at the same time.
---------------------------------------
7/19/12:
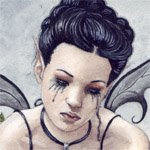
I did quite a bit of work on the fairy! I hope to get this done in the next couple of days. I'm pretty happy with how it's coming along so far. :)

I did quite a bit of work on the fairy! I hope to get this done in the next couple of days. I'm pretty happy with how it's coming along so far. :)

---------------------------------------
*UPDATE* 7/22/12:
Finally Finished!
I'm happy to say that I finished this painting last night and am really happy with how it turned out. It could be my favorite that I've done this year! :)
After finishing the painting, I had to remove it from the board. Since this was my first time stretching my watercolor paper and I had to use heavy duty staples, I wasn't sure how this would go. I just knew that I had to proceed very carefully! The first step was to remove the masking tape. That went well and left a nice clean border around the painting. My main concern was getting the staples out without hurting the painting.


The staples came out easier than I thought they would. I used a pair of needle-nose pliers and gently pried them each out. As long as I could get the pliers under the the staple, they wiggled out pretty easily. A couple of them gave me problems, and I was a little nervous about my hand slipping and accidentally gouging the paper. Luckily it was a success in the end and I got them all out. Next time, I'm definitely going to try a different method of securing the paper down, but the paper turned out so smooth that it is worth the trouble of stretching! The final thing that I did was to trim off the edges that had the staple holes, leaving about a 1/4" or so border.
So here is the finished "Midnight Travelers" (thanks to fellow artist, Wendy Fowler, for suggesting the title!)
8.5 x 12" Watercolor and white goauche. Prints available on my website HERE

Details: